8 Apr 2018 Old Finishing Technique
Hits: 4688
 Several years ago I tried using shellac, and to this day, I’m not entirely sure what happened, but it was a disaster. Most likely, the product I used wasn’t fresh. If shellac isn’t fresh, it won’t dry or harden well. That said, I recommend using flakes instead of pre-mixed formulas. It takes a bit more work but saves lots of hassles in the long run (prepare the mix at least 24 hours in advance). And it will save money since you only need to mix what you can use. Store the remainder in a dry, cool space.
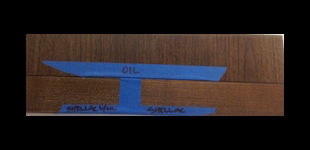
(In this image, there isn't much difference in the appearance in walnut.)
Shellac can be a bit intimidating at first glance, but really there are only a few things you need to know to succeed with this fast-dry finish. First, shellac flakes come in four different colors: blond (or very blond), beige (or blond), amber (or orange) and garnet. I generally stick with amber; it gives the wood a blotch-free warmth. If you go with one of the blonds, there won’t be much color change at all; it works well over stain. The garnet deepens the color even more than amber—an aged look. As always, try a test piece before covering your new project. Next, I already mentioned dewaxed, but just know if shellac doesn’t say dewaxed then it isn’t (Zinsser Bulls Eye Shellac is waxed). “Wax is an ingredient in some shellacs. When waxy shellac dries, the wax allows moisture to permeate the finish, making it less durable” (Rodriquez 39). If it doesn’t have wax, it dries to a hard film and any other finish will adhere to it. Finally, it is important to understand “cut.” “The “cut” refers to the ratio of flakes to alcohol: Add 1 oz. of flakes to a cup (8 oz.) of denatured alcohol to make a 1-lb. cut, 2 oz. of flakes to a cup for a 2-lb. cut, and so on” (Rodriguez 41). Use a lighter cut first to raise the grain and then build up the finish with heavier cuts. Just remember heavier cuts begin to get tacky almost as soon as they are applied so work quickly. Also, remember not to go back over an area that has already been covered even if you see that you’ve missed a spot. Wait for it to dry and then cover the spot with the next coat—overworking shellac will make it glob up or leave brush marks.
Surface preparation is critical to a successful project regardless of what finish you choose. I recommend sanding all surface through the grits to 220. Shellac can be wiped on, brushed or sprayed, be sure and get the right viscosity for the method you choose (a light cut works best for spraying). To get a nice satin finish rubout the final coat with 0000 steel wool or you can cover it with a final coat of oil-based varnish for more protection. Finally, apply a coat of paste wax and buff it out. You’ll have a beautiful satin finish in about two days. “The secret to a perfect [shellac] finish is to apply it quickly with smooth, even strokes” (Woodsmith 11).
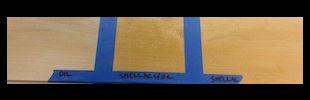
(The amber shellac produces a significant color change on light woods like the maple above.)
Works Cited
Rodriguez, Mario. “Make Shellac Your Go-To Finish.” Fine Woodworking, 2013, pp. 38–41, www.finewoodworking.com/2013/06/06/make-shellac-your-go-to-finish.
“Shellac: Foolproof Finish.” Woodsmith. 2016, pp. 10-11, https://www.woodsmithlibrary.com/view/issue/224/