 “Finishing Before Assembly” Sometimes it's the best option.
I don't like to finish before I've assembled the project. I just seems wrong. However there are some times when it makes sense to finish a project before it is glued together. When I was about to assemble the wine cabinet, I realized it was going to be impossible to get between the wine bottle grid if I didn't at least partly finish before it was completely assembled. I used a combination of partial assembly and partial pre-finish. When parts are going to be too close together to apply a good coat of finish, then it just makes sense to finish first. Also partial assembly is very common. I often finish cabinets and bookcases before putting the back or doors on. This allows easy access to all areas of the project and it avoids corners that are difficult to finish evenly. Finally, finishing solid wood pieces that might cause an uneven reveal during expansion or contraction makes a project look much nicer—for example a shiplap or tongue and groove joint. If you decide to do any type of finishing prior to glue-up make sure you cover the areas to be glued with blue or other masking tape. If you get finish on these areas it will affect the integrity of the glue hold.
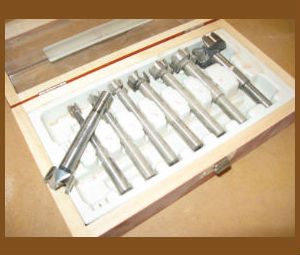
 “A Necessary Tool” The Forstner Bit.
If you don't have Forstner bits as a part of your basic tool collection, you are missing out on an essential woodworking asset. The Forstner bit drills holes like every other drill bit, but it has some huge advantages that make it worth the investment. When I first started out and was still using pattern, I ended up buying one Forstner bit at a time as the pattern recommended. Finally after I had three or four different sizes, I realized how valuable they were, and I bought a whole set. If you use a drill press to create mortises then a Forstner bit is key to drilling out most of the waste. Because the bit uses the rim of the bit rather than the point to guide the bit, it allows you to drill overlapping holes without the bit trying to follow the same path as the previous hole. Additionally, the edges are very clean so they are easy to follow with a chisel to finish the mortise.
 “A Great Tool” The random orbit sander.
I really don't like sanding. It might be safe to say that sanding is probably the thing most woodworkers dislike the most. Unfortunately it is a very critical step in the creation of fine wood furniture. It is especially important to the second most disliked part of woodworking -- finishing. If you haven't prepared your surface well, it won't matter which type of finish you choose it will likely not look good. Over the past few years I've experimented with a number of different types of machine sanders. A couple years ago I purchased a random orbit sander. I had read countless articles, and they always referenced to the random orbit sander. I decided to give it a try. It has been worth every penny, and compared to other tools in the shop, it is a reasonable amount of pennies. There are brands that are quite expensive and perhaps worth the extra money, but I've been very happy with my Porter-Cable.
 “Finishing Options.” Make it Simple.
For me finishing is by far the most complicated part of woodworking. Of all the things I have done in the craft, finishing has been the hardest to learn and get right. At the end of a project that looks amazing -- tenons are cut perfectly with no blow out on the shoulder, the tapered legs are all identical, and the draw slides as smooth as silk -- how do I finish it? Does it need sealer? What is shellac or poly or lacquer? Is oil or water base the best? What's BLO, and how is it different than Danish oil or Tung oil? Do I need a spar or a wipe-on varnish? How do I get the right color – stain, gels, or dye? Top coat – wait, what how many coats do I need? Are they all different? Hold up! Just tell me what to put on my beautifully crafted wood project.