 “Sharpening Basics” A Critical Skill.
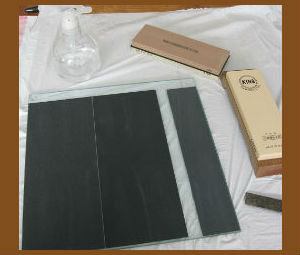
New chisels and hand plane blade aren't already sharpened and ready to use when you first get them. It seems sharp, and it will cut, but it's not as sharp as it can or should be for good woodworking. I don't like sharpening, and I have always felt intimidated by the task, but after I finally got all the right tools it wasn't too bad. There's no great secret to honing a sharp edge. With a little knowledge, the right tools, and some patience, it's pretty easy. A sharp edge is the intersection of two planes; in the case of tools the back and the bevel. Honing is the process of sharpening an edge. Both surfaces must be honed to produce a sharp edge. This requires an abrasive medium to flatten steel. You can use any of several different abrasives to get results. I use Japanese Waterstones made by King; the price is very reasonable. These stones rely on water to create a slurry of abrasives to cut the metal. I also use sandpaper on glass for my courser grits. Start by flattening the back of the blade then hone the bevel. It is a slow boring process, but put on a good movie and settle in, because it's worth it. For more press Read More below.
 “Trip the the Lumberyard” Prepare in advance.
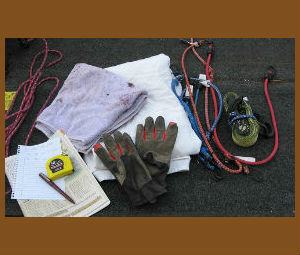
If you haven’t been to a real lumberyard yet and do most of your wood shopping at the box stores, then it’s time to use some of my techniques and get out of the costly box stores and open yourself up to some real wood selection. The greatest thing about a lumberyard is variety of wood types and choices of wood quality. If you are in the greater Albuquerque area, I highly recommend going to the Albuquerque Hardwood Lumber Company at 4100 2nd St. NW. They have a wide selection of mostly domestic hardwoods and a few exotics. The folks there are friendly and helpful whether you’re an expert at buying lumber or if it's your first time. They’ll get you whatever you need. The crew in the warehouse is extremely patient and willing to let you pick out the exact pieces you need – two small boards or 100 board feet. I buy almost all my wood from them, and I’m never disappointed. Shown in the photo are the tools I take with me to the lumberyard. Sometimes I take the whole plan with me, but mostly I have sat down prior and made a list of the wood required for the project – always remember to include extra for waste. It is pretty easy for me to make another trip to the lumberyard if I didn’t get enough, but sometimes I run out at the worst possible time so do your best to get enough without wasting money on too much wood. Click below to read more.
 “Pattern Routing” Use the right bit.
A few weeks ago I wrote an article about using a pattern bit to cut a straight edge. A pattern bit can be used for so much more than cutting a straight edge of course, but to do it well it is important to know about the best router bit for the job. Until I recently read an article in Fine Woodworking Magazine Jan/Feb 2014, I didn't realize how important different bits were. I just used a pretty hefty straight bit, and it managed most challenges. However, I've struggled with hard maple. When the grain pattern switches it can create some minor issues like obvious chip-out or more major issues like complete tear-out that ruins the project. In this article, I've summarized the recommendations of Fine Woodworking. If you would like to see their entire article, pick up the Jan/Feb 2014 magazine or log-on to their site at finewoodworking.com and become a member. Click Read More to see this article.
 “Drill Press Mortise” Cut mortises with a drill press & chisel.
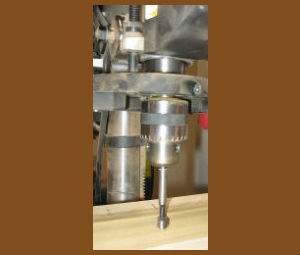
Since the first set of mortises I cut, I've been trying to come up with easier and faster ways to cut them. My dream is to one day have a mortising machine, but the cost is difficult to justify. I primarily relay on a router with an up-cut bit and a jig, but this method requires the creation of a jig and lots of set-up. The old reliable drill-press and chisel method works great and is relatively efficient. It doesn't require expensive tools or lots of preparation. You simply lay out the mortise location and then use the drill press to remove most of the waste then chisel the sides flat. If you have a lot of mortises to cut it takes some time and is hard work, but the results are precise and consistent.