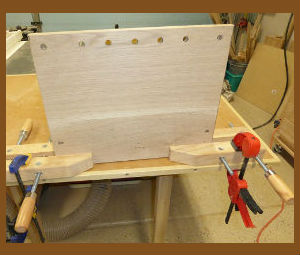
 "Inexpensive Solutions for Holding a Work Piece" Old School Handscrews & Rubber Mats.
If you have a small shop like me, you may not have room for a workbench large enough for a heavy-duty vise, but keeping a firm grip on your work piece is crucial for getting good safe results.
There are a few practical options to secure your work piece even if you don't have a wood vise. I use a couple of inexpensive solutions. You can put these ideas to use even if you have a workbench with a vise. Wood-jawed handscrews look like an old school solution, but they are a tool that every woodworker should have. I don't find them useful or convenient as a glue-up clamp, but they work very well as small vises. They can aid in a variety of tasks. A handscrews clamped to each end of a project to provide stability with a short bar clamp to hold the handscrew in place on the work surface is a great way to hold your work. This formation works great to hold long boards on edge, and a single handscrew and a bar clamp can be used to hold small parts.
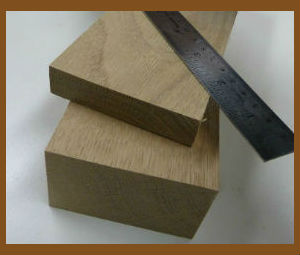 "Hardwood Dimensions" Knowing the dimensions of hardwood.
The hardwood industry has a language all their own. It can be a little confusing if you are new to woodworking. The dimensioning system used in hardwood stores is called the Quarter System. It comes from the saw mill process. They produce hardwood lumber in ¼ inch increments starting with one inch thickness. So when a one inch think board comes off the saw at the mill, it really is four-quarters, or exactly one inch think. The same can be said for 5/4, 6/4, 8/4, and 12/4 inch lumber; they measure 1¼, 1½, 2 or 3 inches respectively.
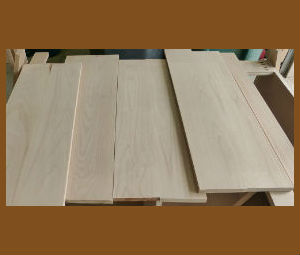 “Jointing a Large Panel” A Fundamental Woodworking Skill.
Making a wide panel from narrower boards is a fundamental woodworking skill. And while there's nothing wrong with using plywood in woodworking, there's something to be said for an heirloom piece of furniture that is crafted entirely from solid wood. Gluing boards edge to edge seems simple in concept, but there's a bit more to it.
These tips will help take you from a good glueup to a great glueup.
1. Choose wood carefully – With most panel glueups, the idea is to make the panel look like one piece of wood. This requires finding boards with a good grain and color match. Simply set the boards side by side during the selection process--at the lumberyard or in the shop. Also consider the direction of growth rings on the ends of the boards. Across the panel, orient some of these rings opposite the others to prevent the panel from bowing.
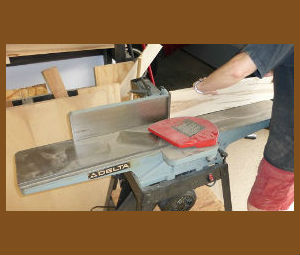 “Prefect Boards Part 2” Joint, Plane, Saw
Step 2: Use the jointer to straighten and smooth one edge of the board, making it square to the face you just planed. The planed face goes against the jointer fence. If the edge has a front to back bend be sure to place the concave edge against the jointer table. This is the same as for step 1. It ensures the board won't rock because two points are always in contact with the table.
Step 3: Now it's time to work on the remaining face. It should be flat and straight, parallel to the opposite face. Your first instinct might be to use the jointer again. After all, it excels at making boards flat and straight. But unless you are very lucky the jointer won't make the second face parallel to the first. Only a thickness planer can do that. Once again check the grain direction and make light cuts, no more then 1/32 inch. Feed the board with the unplanned surface faceup. Make passes until the entire surface is planed and reduced to the desired thickness. The board now has both faces flat, straight, and parallel and one edge that's flat, smooth and square to the faces.